|
|
|
|
|
|
|
Purpose The
purpose of this program is to provide, in one place, a set of tools for
helping to keep track of the risks associated with data backup strategies. An
ad-hoc risk assessment is determined, based primarily on the number and
location of copies of your data. Tools are provided for capturing and saving
the server location of your data folders and automating the running of
scripts that make backup copies of the data. Other
tools are provided for burning copies of data on optical media, and for
keeping track (audit) of when copies have been made and where they are
located. Extensive Help is built-in, including a detailed “Hit and Tips”
section where the author’s shares aspects of his many years of experience in
handling and protecting data in the home environment.
Method of
Operation DataRisk makes it easy to collect and maintain a list of all
your data sources and shared folders in a spreadsheet format. Once collected,
it is possible to use the spreadsheet to keep track of backup operations and
to selected various folders to be used in automated
script operations. It is possible to use you own custom scripts, or to use
pre-defined templates for Microsoft RoboCopy,
Microsoft RichTools and the third-party program
Beyond Compare ™, the author’s favorite data copy program. (Disclaimer: the
author has no interest or investment in Beyond Compare – just deep respect
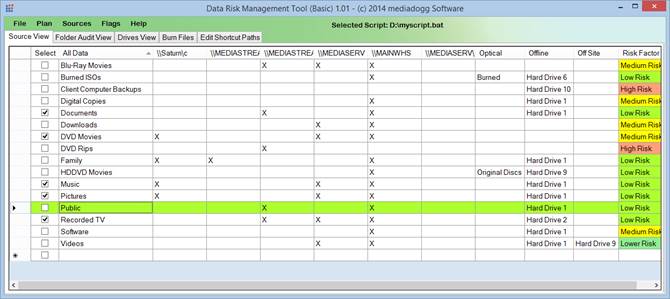
and admiration for its capabilities and quality). DataRisk computes a subjective assessment of the risk of
losing a data folder based on the number of online, offline, optical and
off-site copies: ·
High Risk (red color):
only one online copy of the data. ·
Moderate Risk (yellow):
more than one copy online, but no off-site or optical copy. ·
Low Risk, Lower Risk (light green): off-line and /or optical copies,
but no off-site copy. ·
Lowest Risk (dark green):
More than one online, at least one offline / optical and at least one
off-site copy. Source View
(shown above) This tab shows the data
sources (server path) as columns, folder names as rows, and the entries in
the cells indicate whether a copy of that folder exists on that source. DataRisk uses an “X” automatically, but you can edit the
cell to indicate, for example a mirrored copy (“XX”, “XXX”, etc.). Optical,
offline and off-site entries can be any text, such as “Hard Drive 1” or “In
the safe at Mary’s house”. Optionally, you can append a hard drive
specification for use in scripts, e.g. “USB Drive <F:\:>”.
DataRisk will pass “F:\” to your scripts
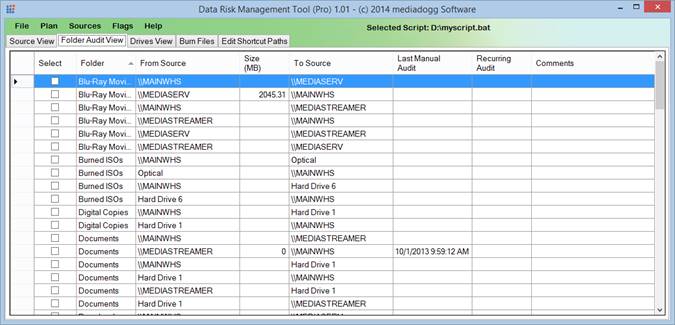
automatically as either the source or target of a folder copy operation. Folder Audit View (Limited in Basic Version) This tab is built using the
“Build Folder List” menu. Pairs of “From” and “To” sources for each folder
are created based on the cell entries in the Source View. Copy scripts can be
then be run to compare, synchronize or backup folders on one to source to
those on another. When automated scripts are used, DataRisk
updates an audit date column so you can keep track of when data was backed up.
You can also manually update a column that keeps track of the date of the
last recurring copy operation.
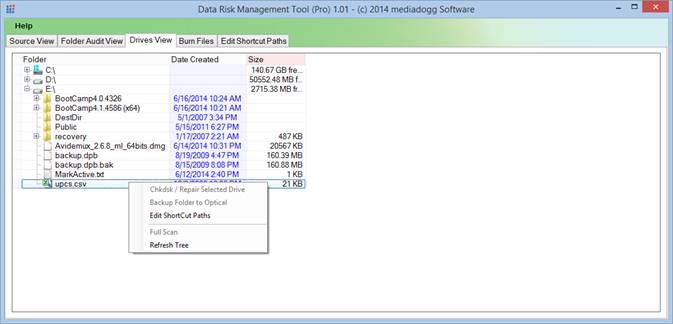
Drives View (Limited in Basic Version) On this tab, a tree of
computer drives is generated. The tree can be expanded to include folders and
folder sizes are automatically calculated. From this tab, folders are
selected to pass over to the Burn Files or Edit Shortcuts tabs.
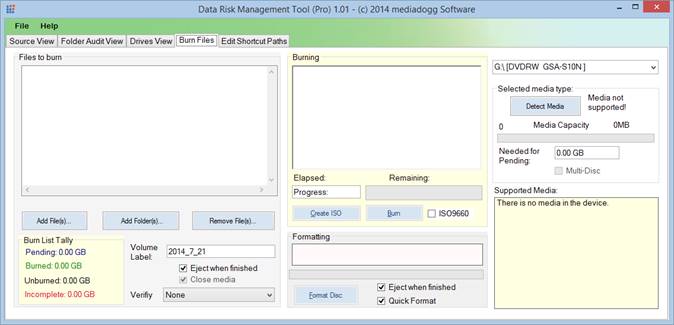
Burn Files View (Pro Version Only) Either from the Drives View
or directly on this tab, folders and files are selected to be burned to
optical media. A smart “just fit” method is used to automatically select
files for burning. Progress is continually monitored and successfully burned
files are tagged “complete”. The process of inserting media and burning just
fit data is repeated until all the data has been backed up.
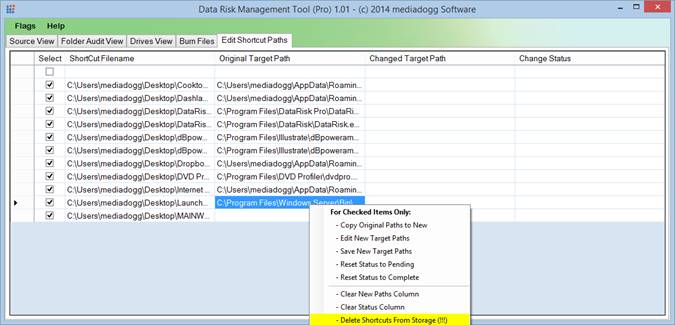
Edit Shortcuts View (Pro Version Only) A list of windows shortcuts
(*.lnk) is collected from a set of folders
specified in the Drives View. Columns are provided to display the original
and updated target paths of the shortcuts. Regex enabled find / replace tools
are provided for quick, easy update of the target path. Once edited, the
updated shortcuts can be saved back to their original folder locations. This
facilitates fixing shortcuts that are invalidated by moving folders between
servers.
Product Overview Menu Summary (Pro version has
all features, Basic version features are highlighted.) Following
is a brief summary of the major menus and features of the program, organized
by the program menu structure. More details are available under the
appropriate heading in the Help menu. File (Source and
Folder Audit Views) -
Load Plan: Load a previously saved plan
(XML file), overwriting the existing plan. -
Save Plan: Save a copy of the plan in a
proprietary XML format. -
Print Plan: Screen print using the Print
Preview function. -
Map Network Drive: Associate a drive letter with
a network folder. -
Un-map Network Drive: Disconnect the networked
drive. -
Clear Plan: Reset the plan to original
status. -
Exit: Close DataRisk.
This will lose all unsaved changes. File (Burn Files View) -
Load
Burn List: Load a previously saved list of files to
burn. -
Save
Burn List: Save a list of files to burn and
associated options choices. -
Set
Pending To Just Fit Media: Automatically determine the set of un-burned files that
will just fit on the space available on the mounted media, and flag them as
pending. Multi-session burning is not supported. -
Set
Selected Items To Pending: Manually flag files as available for the
next burn. -
Set
Selected Items To Burned: Manually flag files that have already
been burned. These files will not be considered when automatically selecting
the best fit batch. -
Set
Selected Items To Unburned: Manually flag a set of files as available
to make pending. -
Clear
Burn List: Remove all items from the available files
list. -
Exit: Close DataRisk. This will lose all unsaved changes. Sources (Source
View) -
Add Shares from Server: Scan network server (e.g. “\\myserver”
) for shared folders and add to
spreadsheet if new, or fill in “X” in the server column if the
folder is already present. -
Add Subfolders from Folder: Scan for subfolders ,
using a Folder Selection Dialog. -
Add Subfolders from Explicit Path: Scan for subfolders of a
typed-in explicit path to add or update the spreadsheet. -
View Exclusions: View a list of folders that
are excluded from the spreadsheet during a scan. -
Exclude Flagged Folders: Remove the flagged folders
from the spreadsheet and keep note. -
Run
Scripts on Flagged Folders: Using the source and target folders as
parameters, as well as a user ID, password, launch either a custom script, RoboCopy, RichCopy or Beyond
Compare. -
Create
Script using Flagged Folders: Prepare a batch script for later use. -
Delete Source: Remove the source column. This
might result in an orphaned ( a folder that is not
shared by any of the sources on the spreadsheet). You can manually delete
those rows if desired. Sources (Folder
Audit View) -
Build Folder List: Create all possible from-to
pairs to populate the Audit tab, used for automating copies among servers and
for creating scripts to be run as scheduled tasks. -
Determine
Sizes of Flagged Folders: Scan folders and total the sizes of all
files found. -
Compute
Total of Flagged Folder Sizes: Add up a set of previously determined
folder sizes. -
Run
Scripts on Flagged Folders: Using the source and target folders as
parameters, as well as a user ID, password, launch either a custom script, RoboCopy, RichCopy or Beyond
Compare. -
Create
Script using Flagged Folders: Prepare a batch script for later use. -
Clear Columns: Clears the contents of all
entries in the selected column. Plan (Source and Folder Audit
Views) -
Edit
Script: Use notepad to manually edit a previously
created script. -
Schedule
Script: Use windows task scheduling to automated
repeated script runs. -
View Log: View
messages and errors generated from running scripts. Flags (Source and
Folder Audit Views) -
Flag All: Flag (check box) all items. -
Un-Flag All: Uncheck all items. -
Invert All: Check all un-checked, and
vice-versa. -
Load Flag List (Sources View): Fill check boxes
based on previously saved list. -
Save Flag List (Sources View):
Save a list of checked items as
an XML file. Help: Detailed
information on using the various features of this program, of which this file
is a part |
||||||||||||||||||||||